Metric Unit Conversions
| This page, though presented in language directed at a
student, is intended to be read and used by an instructor, working at
an appropriate pace in a classroom, helping students understand the
trick involved. The process of writing out the instructions is much
more complicated than the actual process/trick itself. You may use the
content of this Web page in your own classroom and modify it to suit
your students' needs. At the discretion of the instructor, a comparison may be made with the actual multiplication and division to convert metric units. It is intentionally left out here. The "trick" is something to get students to buy into. "Getting away" without doing the math is part of the value of the trick. When it is appropriate, bring up the issue of the precision of measurement. Tell your students that they need to use placeholder zeros right of a decimal point in final answers only when they can demonstrate the measurement is to that level of precision. So if they only measure to millimeter accuracy, their recorded answer should not include zeros like this: 7.00 mm. The precision was only at 7.0 mm. This becomes important later when calculations from the measurements need to be rounded to the same precision as the measurements. Calculated results need to show precision at the level of the measurements. |
Working with metric units is easy. Use the manual tricks described here until you build the habits you need for daily work.
Start with units of length. The trick works with all metric unit conversions, length, volume, mass, etc. (Just change the trick chart to the appropriate units.)
For the moment, focus on distances you can "hold" in the reach of your arms when you reach out to each side of you, like this.
 |
For most of us, our reach is
between about a meter and two meters and we are about the same height
as our reach. For fun, lie down on your back and have a friend mark
your reach. Then spin around and see how you compare measuring those
marks against your head-to-heel distance. Don't stretch your toes out. In history, people often referred to distances by talking about the body. Because your reach with fingertips out straight, people often say "Your reach should exceed your grasp," since you cannot hold onto something unless you can bend your fingertips. Of course, they mean you should work to do more than what is easy to do. "Always reach for bigger success." |
On a piece of paper, make a simple chart like this:
Meter - decimeter - centimeter - millimeter
This chart is the names of units of metric length. They are in order from the biggest you can grasp between your outstretched hands, the meter, to the smallest you can measure by holding your thumb and finger very close together, the millimeter.
If you have a ruler marked off in metric units, it will certainly show millimeters as little marks all along one edge. Count the millimeter spaces between the numbered marks. I counted 10, did you? The numbered marks are a centimeter apart. Every centimeter is ten millimeters long. Check a couple of places along the ruler. Weren't they all the same? That's something called a standard. Every centimeter is ten millimeters long. No centimeter is ever 11 or just nine, always ten. Being standard, we can count on making accurate measurements with rulers.
The ruler I have has the centimeters marked and counted. The numbers written on one edge make it easy to measure the length of anything I can easily hold in my hand.
The ruler I have in front of me is NOT marked in any special way every ten centimeters. Ten centimeters fit inside a decimeter, but in daily measurements which are smaller than a meter almost everybody just uses centimeter units. The pencil in my pocket is about 19 centimeters But I have a longer ruler in the science closet that is a full meter long, and it IS marked in decimeters. You might put your teacher on the spot by asking if they have a ruler with decimeter markings.
My ballpoint pen is about 13 centimeters long. I have an un-sharpened pencil that is a little shorter than 19 centimeters. I'm going to sharpen my pencil. It will get shorter, of course. I need a sharp pencil to gather the lengths of many things in the classroom. That's the next step in this project.
Use your sharp pencil and ruler to help you make a chart like the next one. Yes, I know you usually have the name of something in the first column, but you're going to learn a metric conversion trick, and it works best if the chart looks like this.

Measure a few things at your desk and around the classroom. Be careful to measure precisely. Don't accept "about" in your measurement. Measure using the centimeter as the main measure of length. If the thing is a bit longer than an exact centimeter mark, count the millimeters and then write the length in this form:
My pencil is 18.9 cm
The number 18.9 is the number of centimeters, a dot called a decimal point, and the number of millimeters.
My un-sharpened pencil is 18 centimeters and 9 more millimeters.
That means I write down the length as 18.9 centimeters.
I record that length in the centimeter column and put "pencil length" in as the name of the object I measured.
For most things you measure, the centimeter is the easiest to use as your "base", so most objects will get filled into the chart as some number of whole centimeters and the number of millimeters shown as the number right of the decimal point.
If you measure any objects that are smaller than a full centimeter, go ahead and count them as just millimeters and record in the millimeter column. For example, I measured the same pencil across the unsharpened end. I got 7 millimeters. I wrote the length of the pencil in the cm column and then the width of the pencil in the next line down, but in the mm column and call it "pencil width".
Most people will tell you to do metric conversions between metric units with multiplication and division. It works, but is harder to do than necessary. I want to teach you a trick that you will practice. Once you have enough practice, you'll be able to use the trick to do your metric unit coversions. They'll be just as accurate and much faster than doing the math. Tricks like this one are good because they make your work easier and prevent mistakes.
Write down the names of each basic metric unit of length and put a decimal point after each of the units.
M . dm . cm . mm .
This little chart is your trick.Let's go back and start making some conversions for the objects you measured.
I'll start with my pencil measurements as examples.
I want to figure out how many millimeters long the pencil is. I already measured it as 18.9 centimeters.
I am going to practice the conversion chart trick with my pencil.
To convert from cm to mm put your pencil down on the trick chart. Put the tip of the pencil to the right of cm.
Now loop it to the right until it is to the right of mm.
That's the conversion. Going from cm to mm means moving the decimal point one place to the right. That's the trick.
To convert any centimeter measurement into millimeters, just find the decimal point and move it one place (one loop) right.
That says the pencil we measured as 18.9 cm is also 189. mm
Okay, can it really be that easy? Well, almost.
We need to understand one more thing about numbers. Zeros.
Zeros are place holders in many numbers. They only become significant when you know where the decimal point is.
Read this number: 10
Is the zero important? Yes.
The reason it is important comes from the decimal point somebody "forgot" to show.
The number could also be written a few other correct ways.
10
10.
10.0
10.00
$10.00
(I sneaked the last one in, just in case somebody wants to send me ten dollars to use this conversion trick idea. It also points out that in the US, we use decimal money and the conversion trick works with money too.)
(no money needed - creative commons attribution license)
In this case the number is always "Ten" even though the number of zeros changes. There is no conversion going on. The location of the decimal point does NOT change. When we write down a number as digits, we often "forget" to mark the decimal point, but it is our job to remember that it is there. A scientist or mathematician might say, "The decimal point at the end of a whole number is assumed."
Using this important standard, let's consider another object I measured.
Plastic cup width (across the top) = 23 cm (always write down measurements with a unit)
If I want to convert 23 cm into millimeters, I need to move the decimal point one loop to the right.
I need a place holder to move around "something" with the decimal point.
I need to be focused on the "assumed" decimal point.
Zero is a placeholder when no other digit is there already.
Doing the unit conversion for the pencil length, we started with 18.9 cm, so we already had a digit we could use when we moved the decimal point. It was easy to change 18.9 cm into 189. mm, one step to the right using the trick chart.
For the 23 cm cup, we need to rewrite the number. First we reveal the "forgotten" decimal point.
23. cm
Then we take the next step and put in the zero as a place holder.23.0 cm
Finally we apply the trick chart and shift the decimal point to make the unit conversion.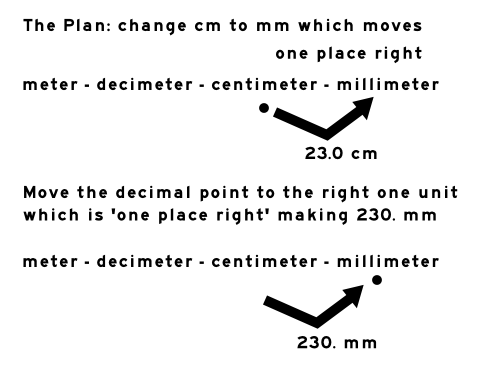
230. mm
It is one step (one place) right from cm to mm on the chart - move the decimal point one digit right.Now try it the other way.
Start with the pencil width of 7 mm.
Put in the "forgotten" or "assumed" decimal point.
The pencil width is 7. mm, and to help us see that we want to show the decimal point location, add a placeholder zero.
The pencil width is 7.0 mm.
Now the number doesn't look like the end of a sentence. Decimal points can sometimes look just like a period that might mean the end of a sentence. To avoid confusion scientists almost always put placeholder zeros into numbers they write. They aren't silly about it, though. Although it would be "correct", writing the pencil width as 7.00000 mm isn't common. It is "right", but looks ridiculous. It also wastes space.
Back to the trick conversion chart. This time we move left from mm to cm a one unit move.
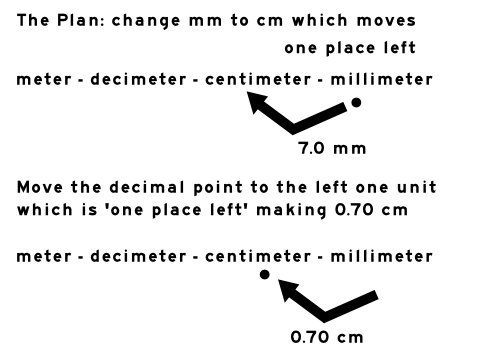
7.0 mm becomes 0.70 cm
The width of the pencil has not changed, just the unit of length for our recorded measurement.I hope you noticed that I recorded the number with placeholder zeros again. This time, I want to draw your attention to the zero before the decimal point in front of the 7 which is another standard for scientists. Scientists want to be sure you see the decimal points so they show a "leading" zero. The value is still the same. A leading zero has no value except to be sure you see the decimal point.
Since you may be learning this trick in a science classroom, you are also learning the behavior of a scientist. The more you practice, the better.
Let's make a couple of big conversions.
How many meters long is the pencil?
How many meters wide is the pencil?
Original measurement of length 18.9 cm
Original measurement of width 0.7 mm
Set up an artificial arrangement of placeholder zeros. This is practice, remember. Neatness is less important than getting the idea clear. After you have practiced enough you can add the placeholder zeros needed.
Length: 00018.900 cm - (same as 18.9 cm)
Width: 0007.00 mm - (same as 7.0 mm)
Look again at the trick chart. M . dm . cm . mm
For the length we are moving two units left, two "places" left.
Loop to the left (from cm to M) around two of the digits in your practice number. That's two places for the decimal to move.
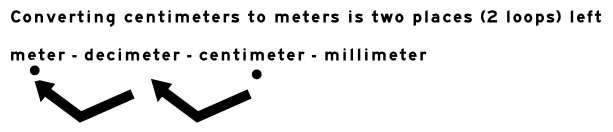
You loop 2 times. Don't drop (write down) the decimal point too soon.
00018.900 cm becomes 000.18900 M
Clean up the practice layout to the "scientific" way: 0.189 Meters
Changing the millimeter pencil width to meters is just as simple.
Loop with your pencil on the chart to the left from mm to M which is three places left. Then do the decimal point to the left the same three steps.
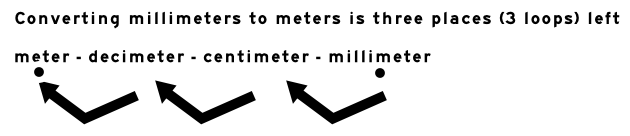
You loop 3 times. Don't drop (write down) the decimal point too soon.
0007.00 mm becomes 0.00700 M
Clean up: 0.007 Meters
Now is your chance to demonstrate you understand the trick chart.
Use this method to fill in the chart where you measured classroom objects. Do all the unit conversions so you show the measured length in every unit on the chart.
Depending on your teacher's expectations, compare your technique with your teammates or wait to get the teacher to check your work.
The trick even works for larger units. Just extend the chart.
Kilometer - Hectometer - Decameter - meter - centimeter - millimeter More loops are now possible, but the conversion is still as easy to do. Remember, you may need more placeholder zeros.
-----------------------------------------
Now, the really great thing about the metric system and this trick: It works for ALL metric unit types.
Liter - deciliter - centiliter - milliliter Same chart, just new words. Same technique. Count the places and move the decimal point. DONE!
Gram - decigram - centigram - milligram Same chart, just new words. Same technique. Count the places and move the decimal point. DONE!
-----------------------------------------
Now, for one final note: When you want to understand metric temperatures (where degrees are called centigrade or Celsius). You only need to know FOUR
temperatures for the air around you in your normal life.
0° Celsius is FREEZING
10° C is COLD
20° C is ROOM TEMP
30° C is HOT
Every other regular temperature is mixed somewhere in there.
In science classes, you're probably also going to need 100° Celsius which is BOILING WATER hot, but you should hope you never have to feel that on your skin.
Everything else falls in between.
Celsius Conversion Web page with printable version.
 You are allowed and encouraged to use and improve this work, asking only that you credit the original work. Creative Commons Attribution License 3.0 and later.