I'll try to use your questions as a guide. Send yours to pced@runeman.org
Each page of your Word document has a standard set of margins. When you look at the Page Layout view (View Menu), you see these standard margins while looking at a full page of text.
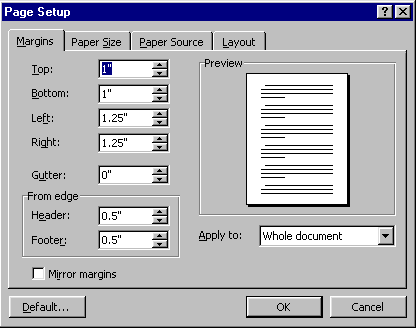
You can set the document margins in Word by selecting the Page Setup option of the File menu. (Margin sheet)
Page Setup Margin options
If you need to fit just a little more on the page, making the margins smaller may just do the trick. Most printers do have a minimum limit. My printer can't print closer than about 0.3 inches from the paper edge. If I try to make the margins smaller than that, letters get cut off where the printer cannot put the ink to make them.
Sometimes the standard margins are just fine for the whole page, but you want special control of margins for selected paragraphs.
For some paragraphs in the body of your text, you may want to increase the margin widths to make a narrower typing area, such as for an extended quotation, allowing it to be visibly different from the surrounding text authored by you. An extra half inch or inch on each side. Increase the margins just for the selected paragraphs.
To see the margin controls, you must have the ruler visible. (The ruler is a View menu option.)
![]()
Ruler
The gray part of the ruler to the left of the zero mark and to the right of the six inch mark are the area of the standard document margins mentioned earlier. The white part of the ruler between zero and six inches is the normal typing space. (six inches of typing space plus a 1.25 inch left margin plus a 1.25 inch right margin equals the 8 ½ inch width of a standard sheet of paper.
There are two margin controls you can move. The one at the left is more complicated than the one at the right. There is only a simple margin stop at the right. You can move it by clicking the small control with the mouse and dragging it toward the middle of the ruler to make the typing area of a paragraph narrower.
Right margin control has only one part.
![]()
The left margin control has three parts.
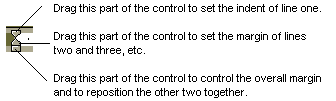
For simple changes, use the bottom part of the left margin control. Click and hold down the left mouse button and drag the control right or left..
The top and center parts of the left margin control adjust the indent of the current (or selected) paragraphs. The top part controls first line indent and the middle control sets the margin of the second and subsequent lines. The two controls are often used to create nested paragraphs. The automatic bulleting tool creates the most common form of nested (underhung) paragraphs where the second and subsequent lines are indented more than the first line of the paragraph.
This is a standard paragraph with no indent at all. It is the
style used
in business correspondence and technical writing.
![]()
![]()
![]() This is a paragraph with a first line
indent. It is the style used in informal
This is a paragraph with a first line
indent. It is the style used in informal
correspondence and fiction writing.
This is a paragraph with the first line extending to the
document's left default margin,
![]()
![]()
![]() with the second line and all the rest in
the paragraph being indented so that the first line will catch
your eye.
with the second line and all the rest in
the paragraph being indented so that the first line will catch
your eye.
![]()
![]()
![]() This style is sometimes called underhung.
This style is sometimes called underhung.
-o[]o-
Personal Computer Education - www.runeman.org
Algot Runeman
Permission granted to print and duplicate.
July 12, 1999