Labeling Pictures in Openoffice
I'll try
to use your questions as a guide. Send
yours to algot@runeman.org
David Groos asked, on the Ubuntu-Education mailing list, about a good tool for annotating images for use in student projects.
I've
had good luck with the Drawing tools in Openoffice.org. They can be
used in pages that are dedicated to drawing elements, but can also be
effectively incorporated into word processing documents that you make
with the Writer tool of Openoffice.
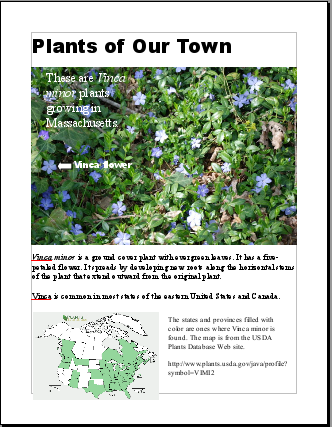
I'll create a single page document that illustrates the process.
We'll call it "Plants of Our Town" and it will incorporate a jpeg image
of a flowering plant, some labels on the image, a small amount of text
that might have been written by a student in elementary or middle
school and a map image from the World Wide Web.
You can find the completed page at:
http://www.runeman.org/tips/oo/labeled-pictures/plants_of_our_town.odt

Let's take it step-by-step.
Open the Writer tool of Openoffice.
Be sure you have drawing tools available: View Menu --> Toolbars --> Drawing.
Pick a font and make a page heading at the top. "Plants of Our Town" is what I've done using Arial Black font in size 36 points.
Insert a picture of the Vinca (which you may download from here: http://www.runeman.org/tips/oo/vinca.jpg)
By
default, the picture will fit to the left and right margins, but as you
note, there are "handles" represented by small squares at the corners.
If you hover your pointer at one of these you will see that you can
change the size.
Also by default, the picture is anchored to the
current paragraph. That actually means you can add text above the
picture and it will automatically move down the page. (If you place the
image first, it anchors to the page by default.
You can modify many things about the picture. The left hand end
icon of the Picture toolbar leads you to a multi-tabbed window of
options. In this case, I left the image alone, but it makes sense to
explore the various options so you can recommend them as appropriate
for your classroom project needs.
 | | This
is an image of the Picture toolbar which automatically appears as a
floating toolbar when you insert the picture, and will be visible when
you have the picture selected. |
The drawing toolbar appears below the text space on my computer.
 | | This Drawing toolbar has many tools you should explore. |
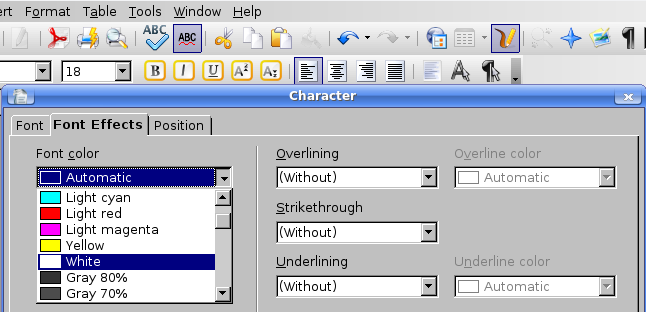
To create a text label, you need to choose the text tool.  Position it where you want and enter the description/label that makes
sense. In this case I typed "These are Vinca minor plants growing in
Massachusetts." and kept the text box short enough that the text took
two lines. I selected the text, used 18 point text and changed the
color to white so it would show up against the background of the
relatively dark image. (Format Menu --> Character --> Font
Effects tab --> Select your color).

(If
you are clicking around, you may find you accidentally choose/select
the picture. To choose/select the text box again, you will need to
click the screen background at the right or left of the page and then
click the text to select the text box. Once you do that, double
click on the text to get the I-beam cursor with which you can select
all or part of the text. You may notice that I made the plant's
scientific name italic, for example.)
The two headed arrow on
the Drawing toolbar accesses the choice of many arrows (actually click
on the little selector triangle next to the double headed arrow).
Select the simple one headed arrow in this example and place it near a
flower.
 | | The object control toolbar appears when you create the arrow. Specify the color you want. |
Create
a label (using the same method as above) indicating that you are
pointing at a flower (which if there were other flowers showing might
be important). You can move the arrow around. And you can move the
label around. It may be convenient to make the arrow and label work
together.
Go to get the image of the map at: http://www.plants.usda.gov/java/profile?symbol=VIMI2
Right
click to be able to save the distribution map image to the folder in
which you have the project saved. Then insert the image in the
way you did before. (Note: Images created by employees of the US
government are in the public domain and free to use.) Always discuss the
proper use of images from the Web with your students. Projects like
these give you a great opportunity to discuss open licenses, copyright
and ethical behavior.)
I used the size control corner "handle"
to reduce the map image to take up less space so it would fit on the
bottom of the single page document. It initially appeared at the top of
page two as I inserted it. That also left space to the right of the map
image. You should make a text box for the text which describes the map.
It is easier to do than trying to figure out how to anchor the image so
you can get regular page text to flow around it.
Remember that,
as a rule, it is easiest to create projects like these in well-named
folders on your hard drive into which you accumulate all the files,
documents and images you want to incorporate. They are easiest to
control that way, especially when you/students are ready to submit
their work.
[Please note that these directions apply specifically to version 3.1
of Openoffice running on Ubuntu-GNU/Linux. Other versions of Openoffice
will work similarly, but the details may be different.]
-o[]o-
Return
to Main Tips
Page
Personal Computer Eductation -
www.runeman.org
Algot Runeman
Date: February 18, 2010

This work is licensed under a Creative
Commons Attribution 2.5 License.


 Position it where you want and enter the description/label that makes
sense. In this case I typed "These are Vinca minor plants growing in
Massachusetts." and kept the text box short enough that the text took
two lines. I selected the text, used 18 point text and changed the
color to white so it would show up against the background of the
relatively dark image. (Format Menu --> Character --> Font
Effects tab --> Select your color).

