ButterBox Project

Most comuter skills curricula include segments about word processing,
spreadsheets and maybe even databases. Mostly, the pattern of
instruction is very step-by-step with activities designed to show that
students have completed the very clearly defined tasks.
Once in a while, though, it is good for students to have learning
experiences which challenge them to create skills in a more open
format. This project is designed to help you (a teacher or technology
comfortable parent) to help a young person get some computer skills and
learn how to find answers to their skill questions along the way. The
project encourages exploration rather than rote learning. Children
quite naturally learn through a process I call "Playful Exploration"
which
The idea was to start small. After introducing the project plan
(approximately 2 weeks of 40 minute classes), I gave instructions to be
sure that the Draw tools were visible (and how to get them back if a
prior student had turned them off), I asked students to do a series of
simple things and to make notes for themselves as needed. They were to
raise their hands when finished. I'd look quickly to see they had
finished and put a mark on my seating chart to show that they had done
the task. The beginning day, I raced around the classroom. Gradually,
the warmup activities took longer and I could spend more time with
individual issues. I'd answer questions, but avoided showing the steps
of how to do something. I encouraged students to help each other,
showing what fancy things they'd done, but asked them not to be too
detailed about how they did it beyond identifying tools on the toolbar,
menu options, and similar leading information.

Student tasks:
1) Draw a rectangle using straight lines. Learn the effect of modifier keys like shift, control, alt.
2) Learn what happens when you click and drag: end point handles, middle of line.
3) Draw a rectangle with a shape tool. Make a square. Make a triangle. Make a circle. (modifier keys?)
4) Make a red circle which just fits into a blue square and a yellow
triangle that is just big enough to fit into the circle. (Clues given
along the way about the importance of stacking order and/or
raising/lowering the object.) (Students encouraged to help others, but
asked to avoid giving exact solutions.)
5) Draw a house with a minimum of a roof, chimney, door, four-pane
window. (Extra credit given for things like roof tiles, 3D perspective,
color/pattern, etc.)
6) Use the fancy text tool to create a colorful shaped word or phrase.
7) Create text boxes and find out how to get them to fit. Compare to
making text in an object like a circle. Find out how to change the
orientation of the text (sideways, upside down).
Homework: (assigned at the
beginning of the first week, due at the end of the first week): Bring
in an empty box of cereal, a box for toothpaste, butter, or another
product to be used as a guide to the project you make. The sample will
be available for others to use in all the classes doing these projects.
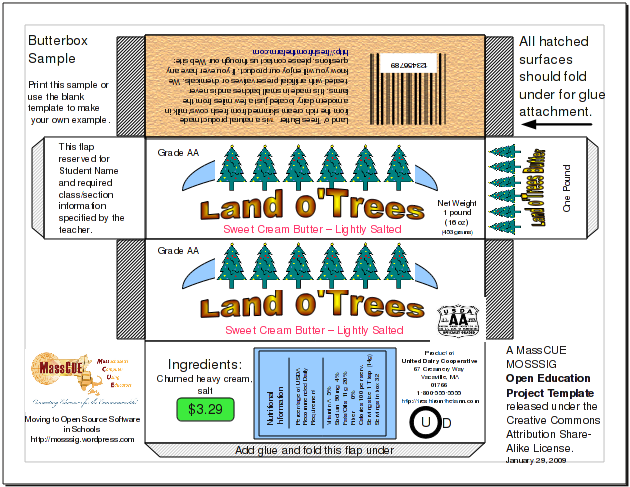
Project: Choose from the
available templates (butterbox, cereal box, toothpaste box) and create
a detailed copy of an actual product or use your imagination to create
your own product box. Make sure you include images, text, a bar code,
and any other elements to make your project look like the real thing.
Ask for help and suggestions. Be helpful to others in the class, too,
but avoid giving them step-by-step instructions. Definitely do not do
work on another student's project. After your project is accepted,
print two copies, one to turn in, one to take home to keep, and give
your saved project file to your teacher. Your teacher (working with you
if possible) will print a copy of the project on index card paper. Use
scissors and glue to make a 3D box from the printed project and turn
that in for final credit.
I put a bit of effort into getting the project to work. I really think
that the first time we did it, the students did the best work. They
were involved in showing me which practice activities worked well and
which ones were unclear or too difficult without some guidance. They
apparently liked being guinea pigs for the project. I expected them to
give honest feedback about the project and they regularly gave me
honest recommendations about how to improve it. The project worked well
for me and my students over several years. We even had the chance to do
it with more than one program.
You are, of course, welcome to use these ideas yourself and enjoy the
experience of getting things going with your own students. On the other
hand you may prefer to have a "packaged" activity instead of developing
it yourself. Therefore, I'd like to offer you a couple of files done
using the OpenOffice.org suite. You can get OpenOffice for Windows,
GNU/Linux and Macintosh from http://wwwopenoffice.org. Looks specifically at the download page. http://download.openoffice.org/other.html
Package Files:
Warmup Guide
Project template and Sample

This project and the package files are free to share and reuse, remix.
Please acknowledge the source of the information and files. Encourage
the Commons.


